Knowledge Base

Managing PHP Versions in Enhance

Managing PHP Versions in Enhance

PHP is the engine that powers most websites, and keeping it up to date is crucial for security and performance. Enhance makes managing PHP versions a doddle!

Understanding PHP Versions

PHP releases new versions regularly, each bringing:

  • Performance improvements - Newer versions are typically faster
  • Security patches - Critical for keeping hackers at bay
  • New features - Modern syntax and capabilities
  • Bug fixes - Squashing those pesky issues

Current PHP Versions

Version Status Recommendation
PHP 8.3 Active Recommended for new projects
PHP 8.2 Active Excellent choice
PHP 8.1 Security fixes only Still good, plan to upgrade
PHP 8.0 End of life Upgrade soon!
PHP 7.4 End of life Upgrade immediately!

Pro Tip: Always use the newest PHP version your application supports. It's faster, more secure, and you'll thank yourself later.

Checking Your Current PHP Version

Via Enhance Dashboard

  1. Navigate to Websites > Your Domain
  2. Look for the PHP Version indicator
  3. It'll show something like "PHP 8.2"

[SCREENSHOT: Website overview showing the PHP version badge]

Via PHP Info

Create a quick test file:

  1. Open File Manager
  2. Create a file called phpinfo.php in your public folder
  3. Add this content:
    <?php phpinfo(); ?>
  4. Visit yourdomain.com/phpinfo.php
  5. Delete the file when done! (Security risk if left public)

[SCREENSHOT: PHP info page showing version and configuration details]

Changing PHP Versions

Per-Website PHP Version

Each website can run its own PHP version - perfect for legacy applications!
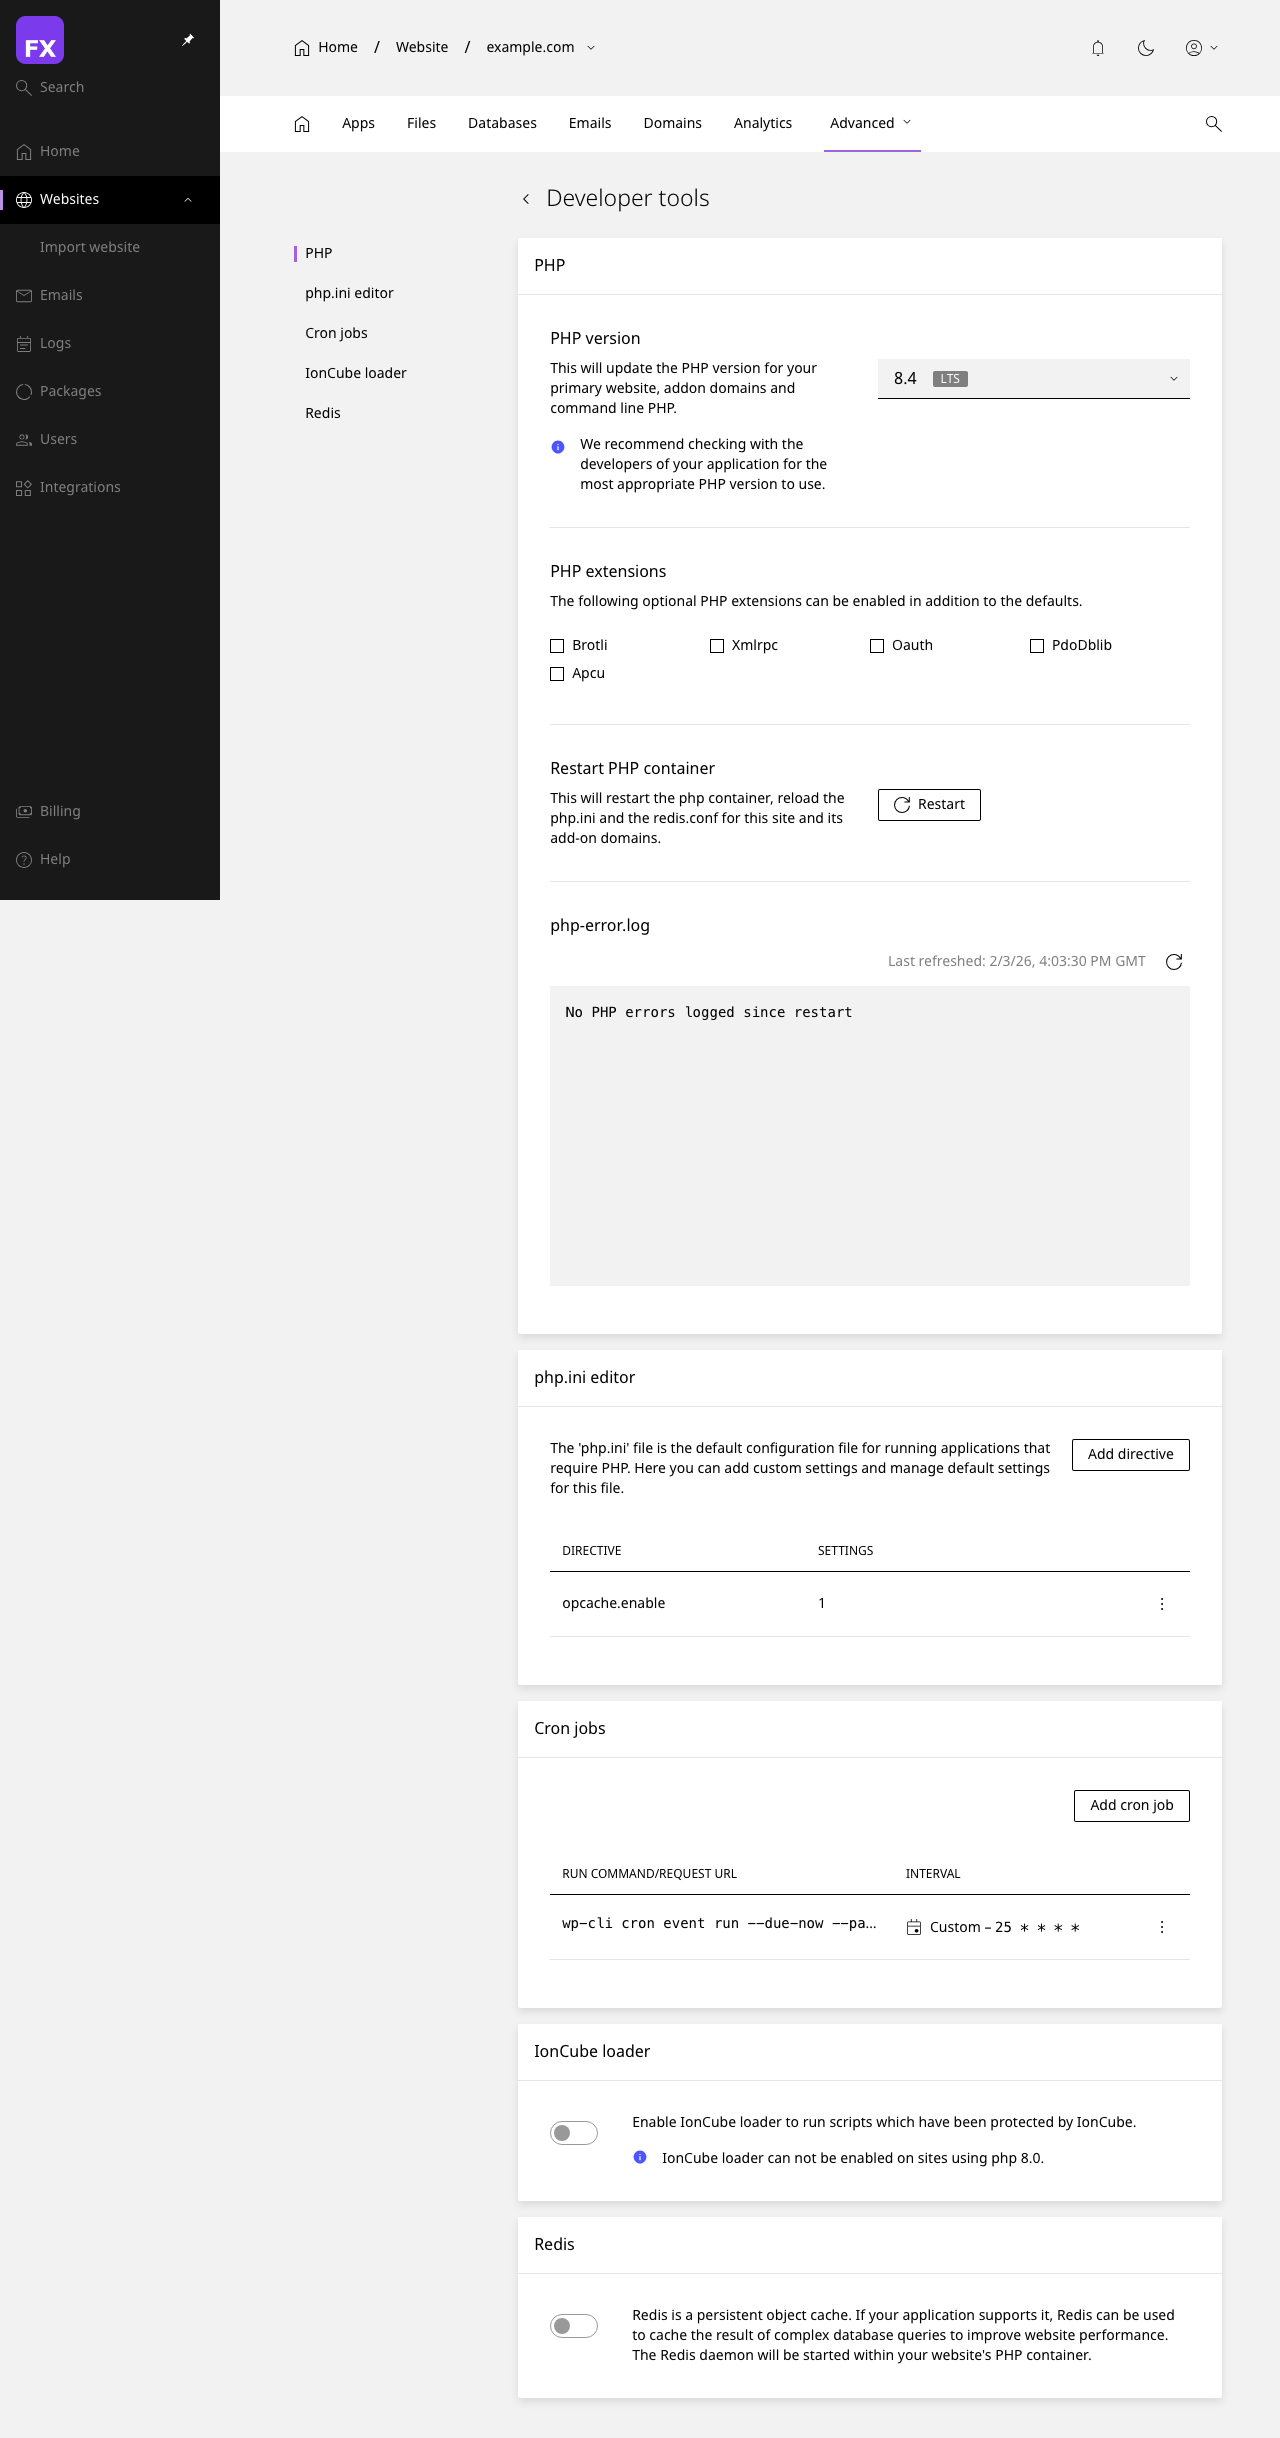
  1. Go to Websites > Your Domain
  2. Click Settings or PHP Settings
  3. Find the PHP Version dropdown
  4. Select your desired version
  5. Click Save

PHP version selection

The change takes effect immediately - no server restart needed!

Bulk PHP Version Changes

Need to update multiple sites? Some Enhance installations support bulk operations:

  1. Go to Websites
  2. Select multiple websites using checkboxes
  3. Click Bulk Actions > Change PHP Version
  4. Select the new version
  5. Apply changes

PHP Configuration (php.ini)

Common Settings You Might Need to Change

Setting Default What It Does
memory_limit 256M Maximum memory a script can use
max_execution_time 30 Maximum seconds a script can run
upload_max_filesize 64M Largest file upload allowed
post_max_size 64M Maximum POST data size
max_input_vars 1000 Maximum form fields

Editing PHP Settings in Enhance

  1. Go to Websites > Your Domain > PHP Settings
  2. Find the setting you want to change
  3. Enter the new value
  4. Save changes

PHP settings configuration

Using .user.ini (Alternative Method)

For more control, create a .user.ini file in your website root:

; Increase memory limit
memory_limit = 512M

; Allow larger file uploads
upload_max_filesize = 128M
post_max_size = 128M

; Longer execution time for complex operations
max_execution_time = 300

; More form fields for complex forms
max_input_vars = 5000

Note: .user.ini changes may take a few minutes to take effect due to caching.

PHP Extensions

Viewing Installed Extensions

  1. Go to PHP Settings > Extensions
  2. See all available and enabled extensions

Or check via phpinfo() - look for the "Loaded Extensions" section.

[SCREENSHOT: PHP extensions list showing enabled modules]

Common Extensions

Extension Purpose
mysqli / pdo_mysql MySQL database connections
curl HTTP requests to external services
gd / imagick Image processing
mbstring Multibyte string handling
zip ZIP file compression
xml XML parsing
json JSON encoding/decoding
openssl Encryption and SSL
intl Internationalization

Enabling/Disabling Extensions

  1. Go to PHP Settings > Extensions
  2. Toggle extensions on or off
  3. Save changes
  4. Your website will use the new configuration immediately

PHP-FPM Settings

Enhance uses PHP-FPM (FastCGI Process Manager) for better performance.

Process Manager Options

Mode Best For Description
dynamic Most sites Adjusts workers based on demand
ondemand Low-traffic sites Workers only spawn when needed
static High-traffic sites Fixed number of workers

Adjusting FPM Settings

  1. Go to PHP Settings > Advanced or PHP-FPM
  2. Adjust settings like:
    • pm.max_children - Maximum worker processes
    • pm.start_servers - Initial workers (dynamic mode)
    • pm.min_spare_servers - Minimum idle workers
    • pm.max_spare_servers - Maximum idle workers
  3. Save changes

[SCREENSHOT: PHP-FPM configuration panel with process manager settings]

Warning: Don't set max_children too high - each process uses memory. Start conservative and increase if needed.

Upgrading PHP: A Checklist

Before upgrading PHP, follow this checklist:

1. Check Compatibility

  • [ ] WordPress: Check minimum PHP requirements
  • [ ] Plugins/Themes: Verify compatibility with new PHP version
  • [ ] Custom code: Test for deprecated functions

2. Create a Backup

  • [ ] Full website backup
  • [ ] Database backup
  • [ ] Note current PHP settings

3. Test First

  • [ ] Create a staging site
  • [ ] Change PHP version on staging
  • [ ] Test all functionality
  • [ ] Check error logs

4. Upgrade Production

  • [ ] Schedule during low-traffic period
  • [ ] Make the PHP version change
  • [ ] Test critical functionality immediately
  • [ ] Monitor error logs

5. Post-Upgrade

  • [ ] Clear all caches
  • [ ] Test contact forms, checkout, login
  • [ ] Monitor for 24-48 hours
  • [ ] Celebrate your security improvement! 🎉

PHP Version Compatibility Issues

Common Errors After Upgrading

"Call to undefined function mysql_connect()"

  • The old mysql_* functions were removed in PHP 7.0
  • Solution: Update code to use mysqli_* or PDO

"Declaration must be compatible with..."

  • PHP 8 is stricter about type declarations
  • Solution: Update function signatures to match parent classes

"Cannot use 'String' as class name"

  • String, Int, Float became reserved in PHP 7
  • Solution: Rename classes that use reserved words

Downgrading PHP

If things go wrong, you can always downgrade:

  1. Go to PHP Settings
  2. Select the previous PHP version
  3. Save changes
  4. Your site should work again while you fix compatibility issues

Troubleshooting

"500 Internal Server Error" After PHP Change

  1. Check error logs for specific errors
  2. Try downgrading PHP temporarily
  3. Look for incompatible code or extensions

"White Screen" After Upgrade

  1. Enable error display temporarily
  2. Check wp-config.php has WP_DEBUG enabled
  3. Review error logs
  4. Common cause: incompatible plugin or theme

Site Running Slowly After Upgrade

  1. Clear all caches (opcode, object, page)
  2. Check PHP-FPM settings aren't too restrictive
  3. Verify memory_limit is adequate
  4. Review slow query logs

Next Steps: Monitor your resources with our Resource Monitoring Guide.

Please rate this article to help us improve our Knowledge Base.

0 0